Someone else is currently editing this document
Only one person can work on a document at a time
TRANSCRIPTION
Language(s) of Transcription
LOCATION
Sráid an Dáma/Dame Street (53.3442, -6.26472)
Story Location
ABOUT THIS DOCUMENT
Document Date
Document Type
Document Description
Language of Description
Keywords
External Web Resources
People
STORY INFORMATION
Title
A plan of part of Dame Street laid out in Lotts for Buildings
Creator
Sproule | Samuel
Contributor
Dublin City Library and Archive
Sproule, Samuel
Samuel Sproule
Publisher
Dublin City Library and Archive
Type
Image
Rights
Dublin City Council
Language
eng
English
Identifier
#7p88s234r
LandingPage
https://www.europeana.eu/item/615/_7p88s234rCountry
Ireland
DataProvider
Dublin City Library and Archive
DatasetName
615_615_Dublin_City_Library_and_Archive
Begin
1784-01-01
End
1784-12-31
Language
ga
Created
2021-11-30T11:19:59.087Z
2022-03-17T12:24:04.337960Z
2022-03-17T12:24:04.338372Z
file:///home/vcap/app/#1784Story Description
Map of south side of Dame Street from Trinity Lane to George’s Lane, laid out in lotts for building with elevation at the top of map. By S. Sproule. Surveyed by Thomas Sherrard. (Marked: ‘No. 2’). General Information: This is the second in a series of two plans for the development of the south side of Dame St. which was prepared for the Wide Streets Commission during 1784 by architect Samuel Sproule, working from surveys by Thomas Sherrard. The first in this series which is marked ‘No. 1’ is a plan of part of the south side of Dame St. , from Palace St. to George’s Lane (now South Great George’s St.) laid out in lots for building. (See WSC/Maps/132). The second in the series, which is marked ‘No. 2’ is this plan of part of the south side of Dame St. from George’s Lane to Trinity St, laid out in lots for buildings to be erected. The plan features 18 building lots, numbered 17 to 34 inclusive. The building line is set back from the then line of Dame St. to facilitate the widening of the street. The elevation is for a terrace of 18 five- storey houses, with shop windows at ground level set into arches; all remaining fenestration is plain. The terrace is pierced in the centre by a lane running beneath an archway with a span of 10 feet, with ornamental keystone and nameplate above. This plan with elevation was submitted to the Wide Street Commission by Sproule on 16 July 1784 and was approved, with the recommendation that cut stone quoins, a cornice and a parapet should be added to no. 17 and no. 18 Dame Street. Sproule’s design was, however, soon to undergo a far more drastic revision. On 10 January 1785 Frederick Trench, a noted amateur architect, was appointed to the Wide Streets Commission. Almost immediately, Trench began to prepare his own design for the range of buildings to be erected on the south side of Dame Street. Trench’s design has not survived, but the minutes of the Commission state that it featured an amount of ornamental stone work, including rustic quoins, balustrades, pedestals, vases and arms. On 25 February 1785, Trench’s design was approved by the Commission and Sproule was ordered to revise his own plan and elevation accordingly. At a meeting held three days later, the Commission further agreed to meet the cost of the proposed ornamental stonework, and Sproule was asked to prepare an estimate of costs involved. Sproule submitted the required elevation to the Commission on 21 May 1785. This elevation was one executed by Aaron Baker on 17 May 1785, probably at Sproule’s request. Baker’s design was the one which was finally adopted and built by the Commission. (See WSC/Maps/342). Baker’s elevation closely follows Sproule’s original design, except that the central and end-of terrace blocks project slightly beyond the building range, and the central archway with lane has been removed. Trench’s ambitious plans for ornamental stonework had evidently been scrapped, as the only ornamentation in Baker’s design consists of rustic quoins on the projecting blocks. Although the estimate of costs of ornamental stonework requested by the Commission from Sproule has not survived, it would appear that Trench’s design had proved to be too expensive to execute Scale: 10' : 1" Size: 36½" x 115" - 93 cms x 156 cms Four sheets of paper, backed with canvas and bound with ribbon; plan on three sheets, with watermark; elevation on one sheet; ink; watercolours.
TRANSCRIPTION
LOCATION
DESCRIPTION
PEOPLE
STORY INFO
TUTORIAL
English Translation
English Translation
Automatically Identified Enrichments
Verify Automatically Identified Enrichments
Verify Automatically Identified Locations
Verify Automatically Identified Persons
Enrichment Mode
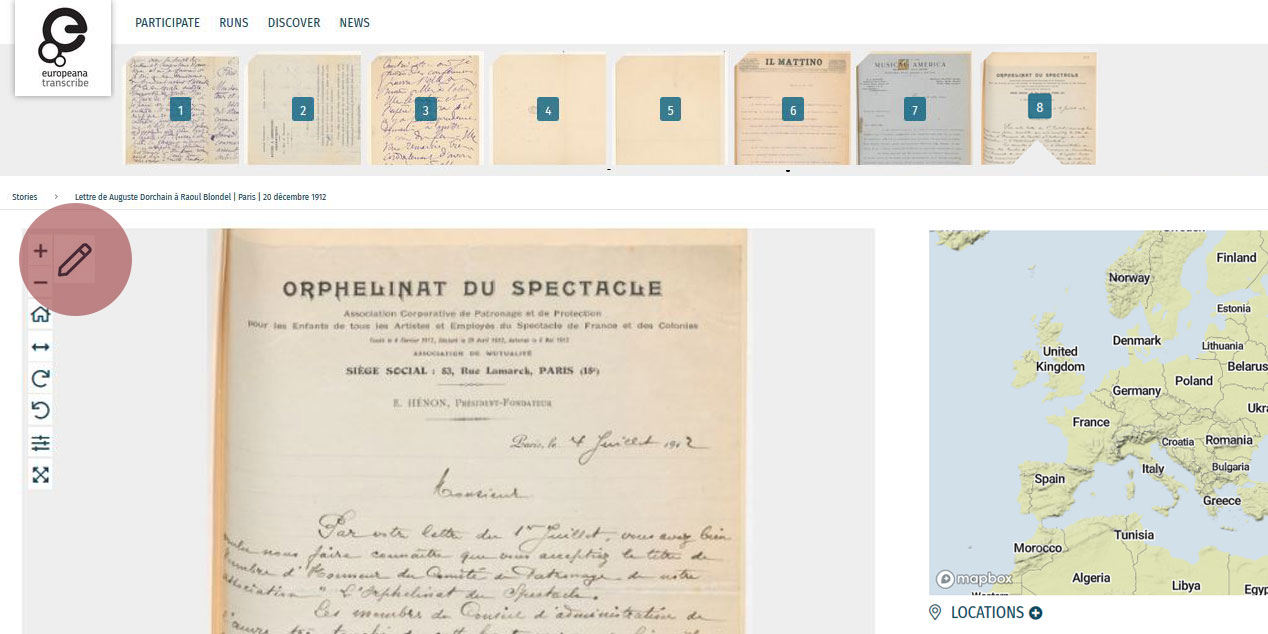
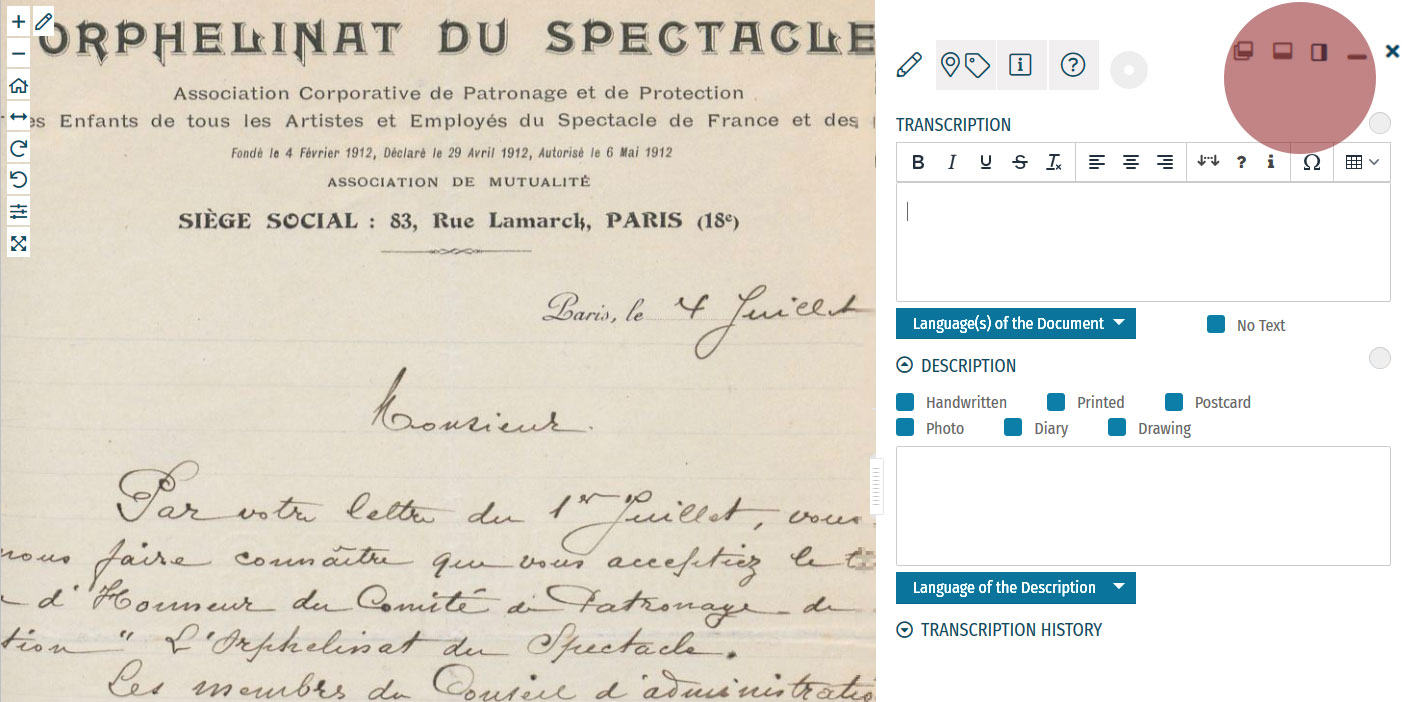
Edit your workspace view by using the top-right menu.
You can have the white Activity Panel docked to the right (default) , to the bottom , or as an independent overlay . If you just want to view the image, you can hide the panel using the minimise button , and then re-open it with the pen button. Adjust the size and position of your Activity Panel according to your preferences.
You enrich documents by following a step-by-step process.
Make sure you regularly save your enrichments in each step to avoid the risk of losing your work.
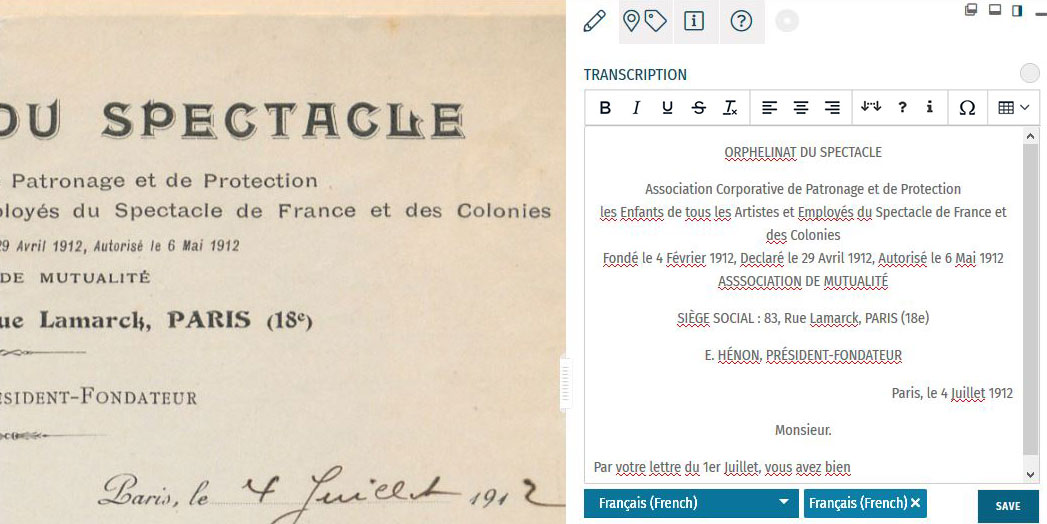
Step 1: Transcription
To start a transcription, select the transcription tab at the top menu of the Activity Panel. Click inside the box underneath the heading TRANSCRIPTION and start writing your transcription. When needed, use the toolbar to format your text and to add special characters and tables. A guide to the transcription toolbar is available in the Formatting section of this tutorial.
Identify the language(s) of the text using the dropdown list under the transcription box. You can select multiple languages at once.
If the item has no text to transcribe, tick the checkbox ‘No Text’.
Once you have finished your transcription, click SAVE.
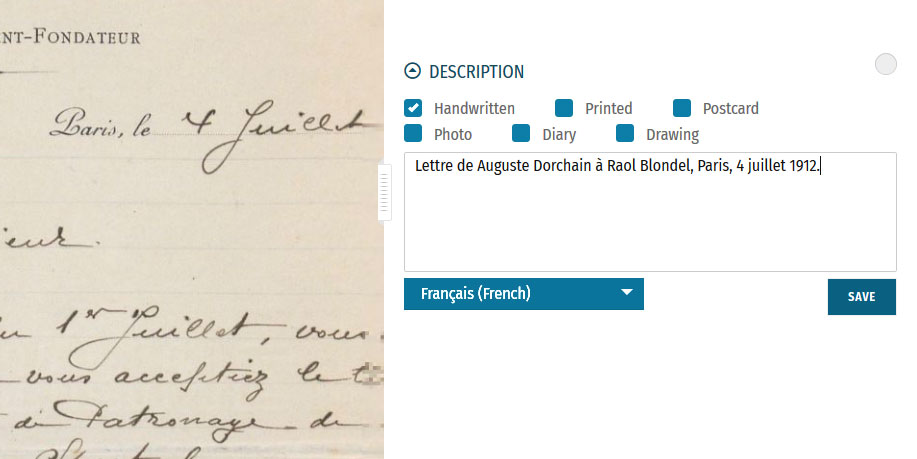
Step 2: Description
You can add a description to the item underneath the Transcription section.
The first task is to identify what type of document the item is: a handwritten or printed document, a postcard, photo, drawing and/or part of a diary. Tick the category which best applies to the item. Multiple categories can be selected at once.
The second task is to write a description of the contents. Click inside the box underneath the heading DESCRIPTION. Here, you can write what the item is, what it is about, and specify the images and objects that appear in the item.
Identify the language of the description text that you wrote using the dropdown list underneath. You can only select one language.
Once you have finished your description, click SAVE.
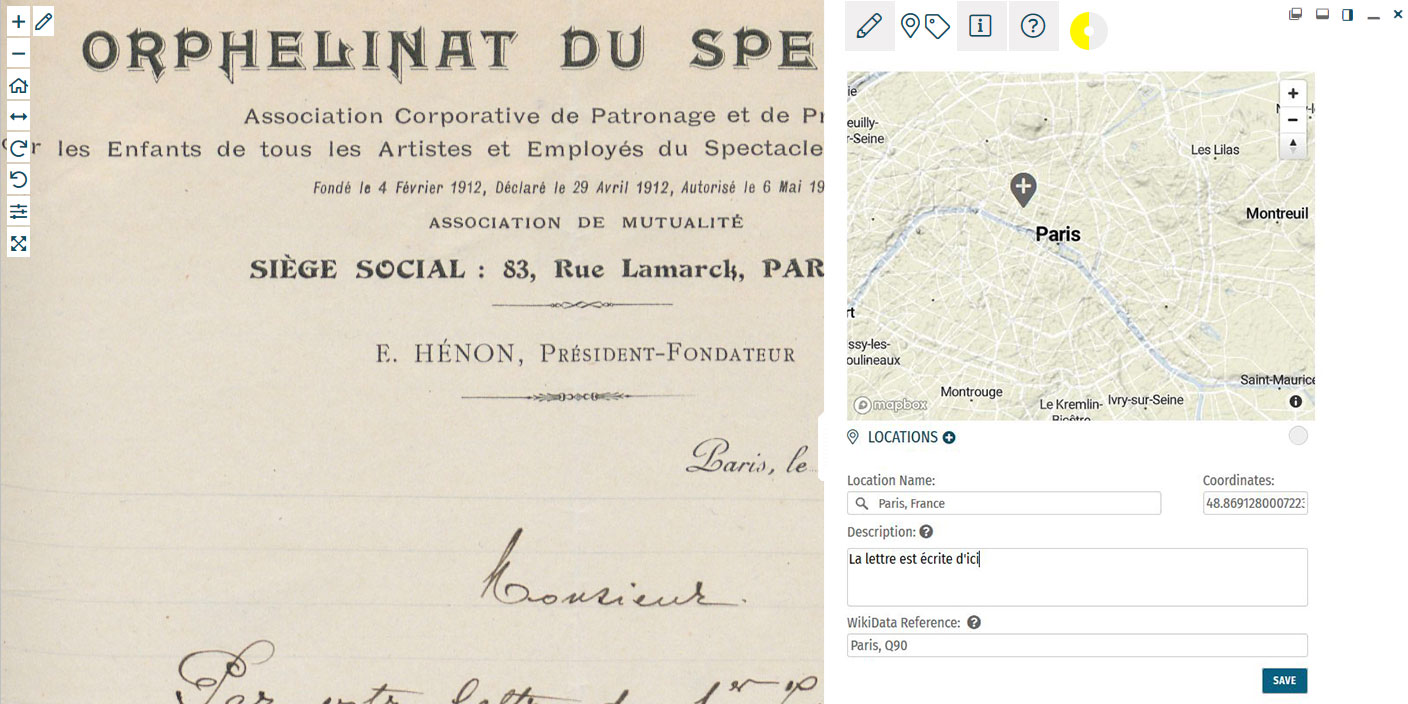
Step 3: Location
If you find a location mentioned or recognise a place in the item, you can create a geotag and pin it to the item map. Multiple locations can be attached to the item. To tag locations, select the tagging tab at the top menu of the Activity Panel. Click the plus next to the heading LOCATIONS. Type the location into the search bar and select the result that best applies. A new pin will be placed into the map. The location name should be a clear georeference, e.g. a country, city or address. Make adjustments to the location name if necessary. You can also adjust the position of the pin by dragging it on the map. If you want to add further details to the location, you can write a (short) description. This could include extra information about the geotag (e.g. the building name or a significant event that took place at the location) or the relevance of the place to the item (e.g. the hometown of the author). You can also add a Wikidata reference to link the location to a stable source. Search for the reference using the Wikidata fields. Once you have finished your location tag, click SAVE. You can find the place(s) tagged to the item in grey at the bottom of the Location(s) section.Step 4: Tagging
Below the Locations section is the Tagging section, where you can add the following annotations:
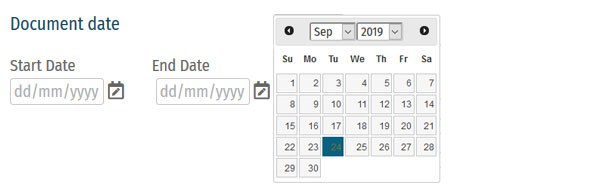 Document Date:
Here, you can add dates that correspond to the item. This could include the dates mentioned in the text (e.g. in diary pages), the date of a related historical event (e.g. the end of WWI), or when the item was created (e.g. from a dated signature on an illustration). You can either define this as a single date or as a longer time frame.
To tag dates to the item, write the start and end dates in DD/MM/YYYY format in the fields or select the dates by clicking on the calendar.
If you only have one date to add, insert the same date into both start and end fields.
If you don’t know the exact days, you can also tag the date on the scale of months (MM/YYYY) or years (YYYY).
Once you have finished your date tag, click SAVE DATE.
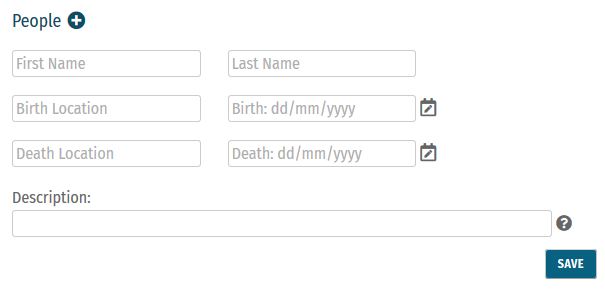 People:
People mentioned as creators or subjects in the item can also be tagged. Depending on the information you might have, you can enter the person’s first and last names, as well as their dates of birth and death. There is also the option to write a short description of the person, explaining who they are or their relevance to the item, e.g. the person’s occupation or their relation to another tagged person.
Multiple people can be tagged to one item.
Once you have finished your person tag, click SAVE.
 Keywords:
Here, you can freely add keywords related to the topic and content of the item. This could include particular themes (e.g. art, music, war), subjects (e.g. children, cooking, France), or particular historical affiliations (e.g. 20th century, Austro-Hungarian Empire, Fall of the Iron Curtain).
Multiple keywords can be added and they can be written in any language.
Write your keyword tag into the field and click SAVE.
 Other Sources:
External websites with information about the item’s content can be linked here. This could include links to further data about a person mentioned, a particular historical event or links to digital versions of newspapers that appear in photos or clippings in a notebook.
To add a link, click the plus next to the heading ‘Other Sources’. Enter the URL into the Link field, and write a short description of this link in the Additional Description field.
Multiple links can be tagged to one item.
Once you have finished your tag, click SAVE.
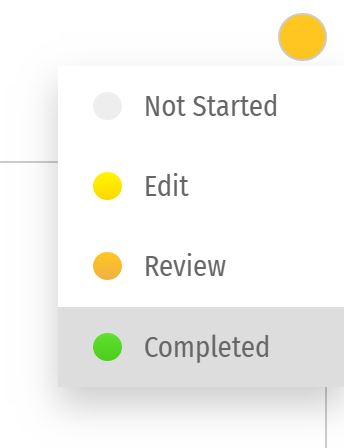
Step 5: Mark for Review
Once you have saved your contribution, the task will automatically change to the Edit status. If you think the task is finished, you can mark it for review. Note that you have to be at Runner level or above to do this (see: Miles and Levels). Click on the yellow circle next to the section heading and select Review in the list that appears. The task now needs to go under Review by another volunteer.Formatting
Review
 All enrichments need to be edited and reviewed by more than one volunteer to ensure that they are as accurate as possible.
Only Sprinters and Champions can edit tasks in the Review stage and mark them as Complete. (see: Miles and Levels)
You can review a task (Transcription, Description, Locations, or Tagging) when the circle next to the heading is coloured orange .
During the review process, pay close attention to the following requirements:
All enrichments need to be edited and reviewed by more than one volunteer to ensure that they are as accurate as possible.
Only Sprinters and Champions can edit tasks in the Review stage and mark them as Complete. (see: Miles and Levels)
You can review a task (Transcription, Description, Locations, or Tagging) when the circle next to the heading is coloured orange .
During the review process, pay close attention to the following requirements:
-
- Transcription: The complete text in the item has been properly transcribed and the transcription is formatted as accurately as possible. The correct language(s) are selected and the transcription contains no missing or unclear icons.
-
- Description: The description is accurate and detailed (especially items without text to transcribe, e.g. photos), and the appropriate categories have been ticked.
-
- Location(s): All locations have been correctly tagged. The location name is accurate and matches the coordinates and the pin on the map. The description is clear and concise, and the Wikidata reference (if any) is correct.
-
- Tagging: Document dates are completed and as precise as possible. All mentioned people are tagged and their data is correct. All added keywords are applicable to the item, and other sources have accurate information and functioning links.
Completion Statuses
| GREY |
| 1. NOT STARTED |
| Tasks have not been started. |
| YELLOW |
| 2. EDIT MODE |
| Tasks have been started, but not yet finished. Additions and edits can still be made. |
| ORANGE |
| 3. REVIEW |
| Tasks are finished, but need final review by Sprinter or Champion transcribers. |
| GREEN |
| 4. COMPLETED |
| Tasks have been fully completed and reviewed. No further changes need to be made. |
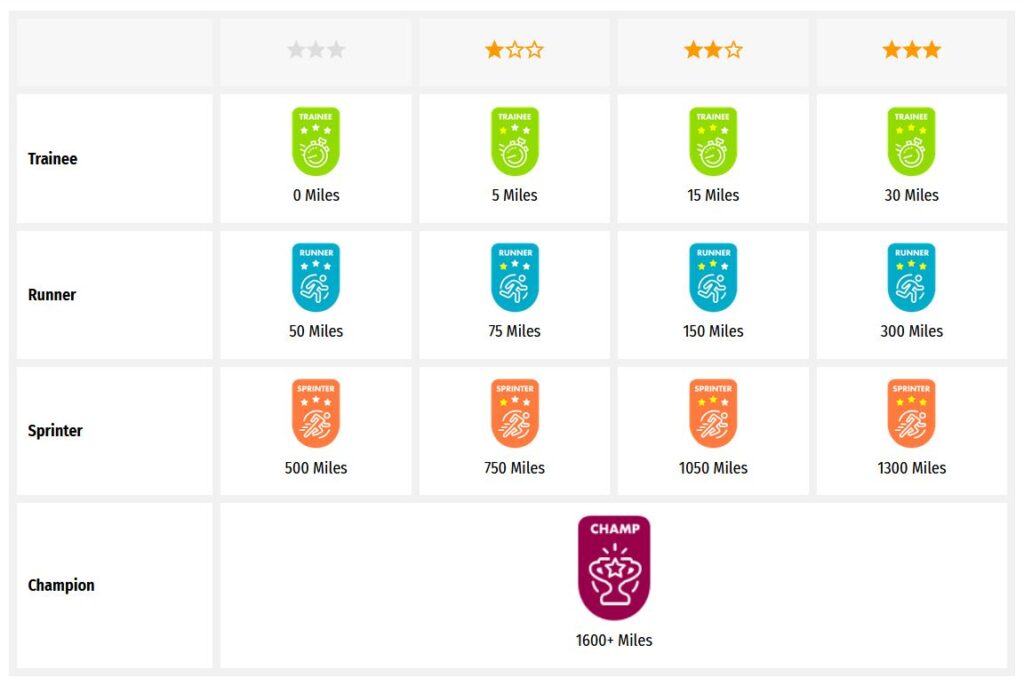
Miles and Levels
Transcribathon is a competitive marathon. You do not enrich documents alone, but compete and work with other volunteers to ensure the quality of your work. When you first create a Transcribathon account, you only have the ability to start and edit tasks. The more you enrich documents, the closer you become to advancing to a higher level, which can unlock abilities like reviewing and completing tasks.| Level | Abilities |
|---|---|
| Trainee | Basic abilities: start and edit tasks |
| Runner | Basic abilities, mark finished tasks for review |
| Sprinter | All Runner abilities, mark reviewed annotations as completed |
| Champion | All Sprinter abilities, mark reviewed transcriptions as completed |
| Tasks | Miles Received |
|---|---|
| Transcription | 1 Mile for every 300 characters transcribed |
| Description | 1 Mile for every 5 Descriptions added |
| Location | 1 Mile for every 5 Locations added |
| Tagging | 1 Mile for every 5 Tags added |
| Reviewing | 1 Mile for every 10 items marked as complete |