Someone else is currently editing this document
Only one person can work on a document at a time
Feldbrief von Otto Gronau Item 6 Item 1
TRANSCRIPTION
Language(s) of Transcription
LOCATION
La-Bassée (50.5391, 2.81015)
Story Location
ABOUT THIS DOCUMENT
Document Date
Document Type
Document Description
Language of Description
Keywords
External Web Resources
People
STORY INFORMATION
Title
Feldbrief von Otto Gronau
Creator
Otto Gronau
Source
UGC
Contributor
europeana19141918:agent/5c6d7392347306fd4f8911eb927fa3a0
Date
1915-05
1915
Type
Story
Language
deu
Deutsch
Country
Europe
DataProvider
Europeana 1914-1918
Provider
Europeana 1914-1918
Rights
http://creativecommons.org/publicdomain/zero/1.0/ http://creativecommons.org/licenses/by-sa/3.0/Year
1915
DatasetName
2020601_Ag_ErsterWeltkrieg_EU
Begin
1915-05
End
1915
Language
mul
Agent
Bärbel Dahlhaus | europeana19141918:agent/5c6d7392347306fd4f8911eb927fa3a0
Otto Gronau | europeana19141918:agent/dfa88118b79ef0eafe16d08a61e2c060
Created
2019-09-11T08:05:52.883Z
2020-02-25T07:59:46.841Z
2014-05-13 13:36:13 UTC
Provenance
INTERNET
Story Description
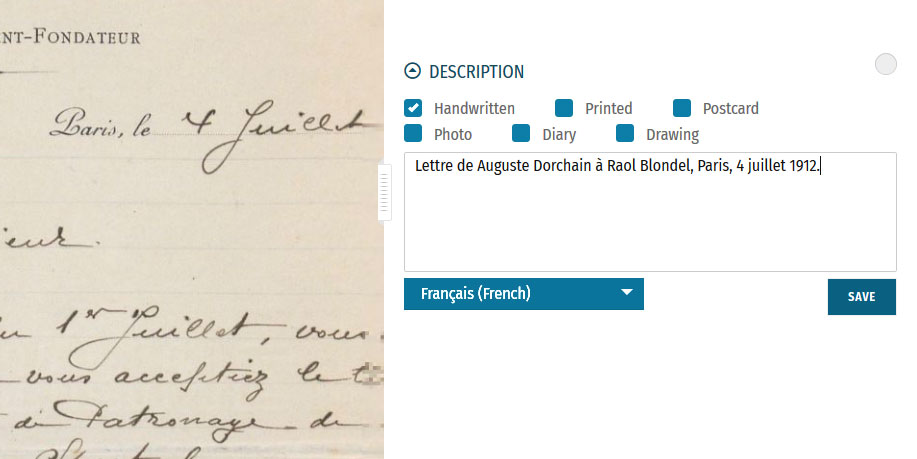
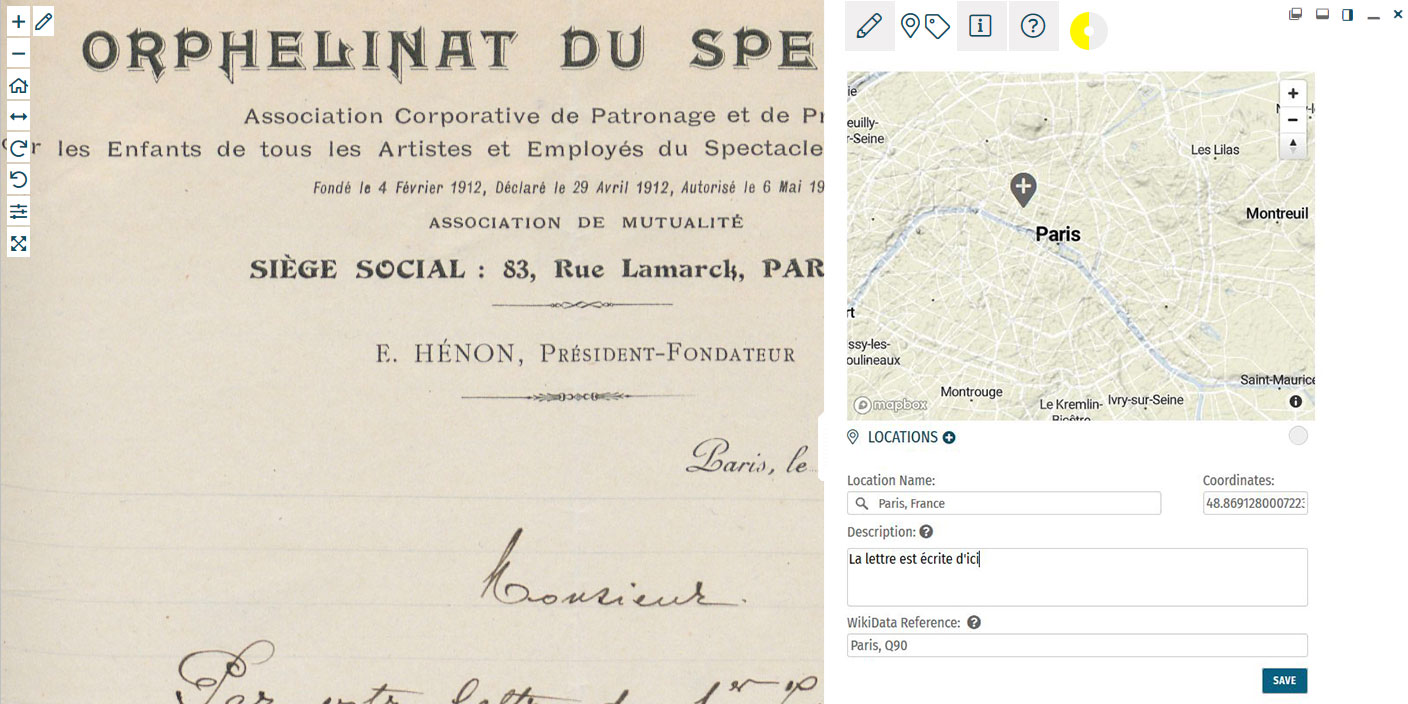
In den Unterlagen meines verstorbenen Vaters Friedrich Gronau findet sich ein Brief seines älteren Bruders Otto, der über eine Schlacht des 1. Weltkrieges berichtete, vermutlich die Frühjahrsschlacht bei La-Bassée (09.05. -23.07.1915). Warum dieser Brief - neben nur zwei Fotos aus der Kindheit und Jugend meines Vaters - die Verluste des 2. Weltkrieges überdauert hat, kann ich nicht sagen. Otto Gronau ist der älteste Sohn von Ludwig Gronau und Selma, geb. Liehr, vermutlich 1895 geboren. Friedrich (Fritz) folgte 1897; der Vater starb bereits 1902, eine jüngere Schwester 1903. Das erste Foto zeigt die Mutter mit ihren beiden Söhnen, vermutlich um 1910, das zweite Foto zeigt Fritz als jungen Soldat vor seiner Verwundung. Otto fiel am 07.07.1917 in den Kämpfen östlich von Cerny und ist auf dem Soldatenfriedhof Cerny-en-Laonnois begraben (drittes Foto). Fritz erhielt vermutlich Anfang 1918 durch einen Granatsplitter eine schwere Kopfverletzung und wurde anschließend zur Offiziersausbildung nach Liebau geschickt, wo er das Kriegsende erlebte.Fotos 1-5: Brief Otto Gronaus & Transkription des Briefes; Foto 6: Selma Gronau mit den Söhnen Otto (stehend) und Fiedrich; Foto 7: Friedrich Gronau, vermutlich 1916 oder 1917; Foto 8: Grab Otto GronausFeldbrief mit Fotos und Transkription50.539237,2.810181000000057Feldbrief
TRANSCRIPTION
LOCATION
DESCRIPTION
PEOPLE
STORY INFO
TUTORIAL
English Translation
English Translation
In the documents of my deceased father Friedrich Gronau there is a letter from his older brother Otto, who reported on a battle of the First World War, probably the spring battle near La-Bassée (May 9th - July 23rd, 1915).
I cannot say why this letter - along with only two photos from my father's childhood and youth - survived the losses of World War II.
Otto Gronau is the eldest son of Ludwig Gronau and Selma, née Liehr, probably born in 1895.
Friedrich (Fritz) followed in 1897; the father died in 1902, a younger sister in 1903.
The first photo shows the mother with her two sons, probably around 1910, the second photo shows Fritz as a young soldier before he was wounded.
Otto fell on July 7th, 1917 in the fighting east of Cerny and is buried in the Cerny-en-Laonnois military cemetery (third photo).
Fritz probably suffered a severe head injury from shrapnel in early 1918 and was then sent to Liebau for officer training, where he saw the end of the war. || Photos 1-5: Letter from Otto Gronau & transcription of the letter; Photo 6: Selma Gronau with her sons Otto (standing) and Fiedrich; Photo 7: Friedrich Gronau, probably 1916 or 1917; Photo 8: Grave of Otto Gronau || || Field letter with photos and transcription || 50.539237,2.810181000000057 || field letter
Automatically Identified Enrichments
Verify Automatically Identified Enrichments
Verify Automatically Identified Locations
Verify Automatically Identified Persons
Enrichment Mode
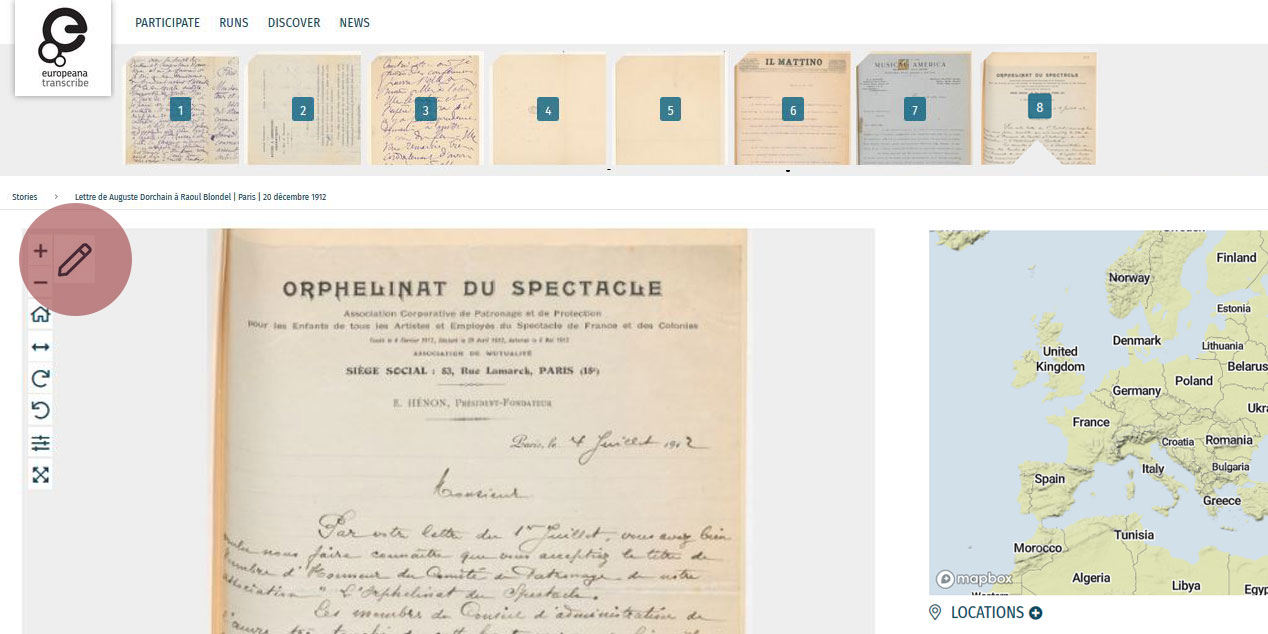
Edit your workspace view by using the top-right menu.
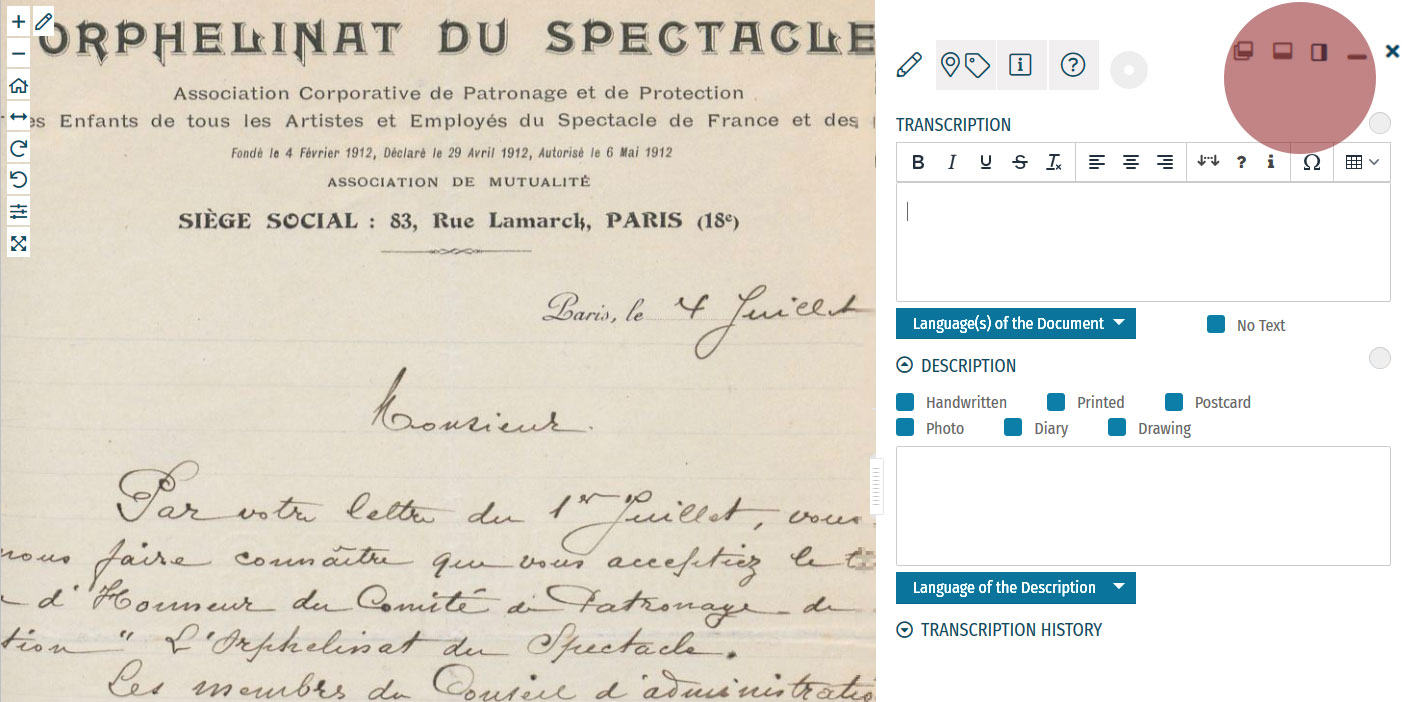
You can have the white Activity Panel docked to the right (default) , to the bottom , or as an independent overlay . If you just want to view the image, you can hide the panel using the minimise button , and then re-open it with the pen button. Adjust the size and position of your Activity Panel according to your preferences.
You enrich documents by following a step-by-step process.
Make sure you regularly save your enrichments in each step to avoid the risk of losing your work.
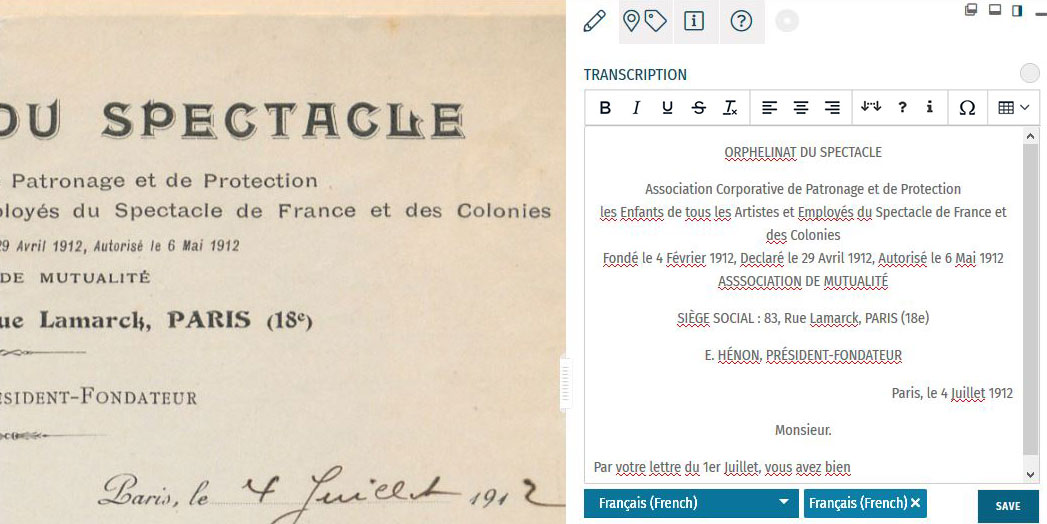
Step 1: Transcription
To start a transcription, select the transcription tab at the top menu of the Activity Panel. Click inside the box underneath the heading TRANSCRIPTION and start writing your transcription. When needed, use the toolbar to format your text and to add special characters and tables. A guide to the transcription toolbar is available in the Formatting section of this tutorial.
Identify the language(s) of the text using the dropdown list under the transcription box. You can select multiple languages at once.
If the item has no text to transcribe, tick the checkbox ‘No Text’.
Once you have finished your transcription, click SAVE.
Step 2: Description
You can add a description to the item underneath the Transcription section.
The first task is to identify what type of document the item is: a handwritten or printed document, a postcard, photo, drawing and/or part of a diary. Tick the category which best applies to the item. Multiple categories can be selected at once.
The second task is to write a description of the contents. Click inside the box underneath the heading DESCRIPTION. Here, you can write what the item is, what it is about, and specify the images and objects that appear in the item.
Identify the language of the description text that you wrote using the dropdown list underneath. You can only select one language.
Once you have finished your description, click SAVE.
Step 3: Location
If you find a location mentioned or recognise a place in the item, you can create a geotag and pin it to the item map. Multiple locations can be attached to the item. To tag locations, select the tagging tab at the top menu of the Activity Panel. Click the plus next to the heading LOCATIONS. Type the location into the search bar and select the result that best applies. A new pin will be placed into the map. The location name should be a clear georeference, e.g. a country, city or address. Make adjustments to the location name if necessary. You can also adjust the position of the pin by dragging it on the map. If you want to add further details to the location, you can write a (short) description. This could include extra information about the geotag (e.g. the building name or a significant event that took place at the location) or the relevance of the place to the item (e.g. the hometown of the author). You can also add a Wikidata reference to link the location to a stable source. Search for the reference using the Wikidata fields. Once you have finished your location tag, click SAVE. You can find the place(s) tagged to the item in grey at the bottom of the Location(s) section.Step 4: Tagging
Below the Locations section is the Tagging section, where you can add the following annotations:
 Document Date:
Here, you can add dates that correspond to the item. This could include the dates mentioned in the text (e.g. in diary pages), the date of a related historical event (e.g. the end of WWI), or when the item was created (e.g. from a dated signature on an illustration). You can either define this as a single date or as a longer time frame.
To tag dates to the item, write the start and end dates in DD/MM/YYYY format in the fields or select the dates by clicking on the calendar.
If you only have one date to add, insert the same date into both start and end fields.
If you don’t know the exact days, you can also tag the date on the scale of months (MM/YYYY) or years (YYYY).
Once you have finished your date tag, click SAVE DATE.
 People:
People mentioned as creators or subjects in the item can also be tagged. Depending on the information you might have, you can enter the person’s first and last names, as well as their dates of birth and death. There is also the option to write a short description of the person, explaining who they are or their relevance to the item, e.g. the person’s occupation or their relation to another tagged person.
Multiple people can be tagged to one item.
Once you have finished your person tag, click SAVE.
 Keywords:
Here, you can freely add keywords related to the topic and content of the item. This could include particular themes (e.g. art, music, war), subjects (e.g. children, cooking, France), or particular historical affiliations (e.g. 20th century, Austro-Hungarian Empire, Fall of the Iron Curtain).
Multiple keywords can be added and they can be written in any language.
Write your keyword tag into the field and click SAVE.
 Other Sources:
External websites with information about the item’s content can be linked here. This could include links to further data about a person mentioned, a particular historical event or links to digital versions of newspapers that appear in photos or clippings in a notebook.
To add a link, click the plus next to the heading ‘Other Sources’. Enter the URL into the Link field, and write a short description of this link in the Additional Description field.
Multiple links can be tagged to one item.
Once you have finished your tag, click SAVE.
Step 5: Mark for Review
Once you have saved your contribution, the task will automatically change to the Edit status. If you think the task is finished, you can mark it for review. Note that you have to be at Runner level or above to do this (see: Miles and Levels). Click on the yellow circle next to the section heading and select Review in the list that appears. The task now needs to go under Review by another volunteer.Formatting
Review
 All enrichments need to be edited and reviewed by more than one volunteer to ensure that they are as accurate as possible.
Only Sprinters and Champions can edit tasks in the Review stage and mark them as Complete. (see: Miles and Levels)
You can review a task (Transcription, Description, Locations, or Tagging) when the circle next to the heading is coloured orange .
During the review process, pay close attention to the following requirements:
All enrichments need to be edited and reviewed by more than one volunteer to ensure that they are as accurate as possible.
Only Sprinters and Champions can edit tasks in the Review stage and mark them as Complete. (see: Miles and Levels)
You can review a task (Transcription, Description, Locations, or Tagging) when the circle next to the heading is coloured orange .
During the review process, pay close attention to the following requirements:
-
- Transcription: The complete text in the item has been properly transcribed and the transcription is formatted as accurately as possible. The correct language(s) are selected and the transcription contains no missing or unclear icons.
-
- Description: The description is accurate and detailed (especially items without text to transcribe, e.g. photos), and the appropriate categories have been ticked.
-
- Location(s): All locations have been correctly tagged. The location name is accurate and matches the coordinates and the pin on the map. The description is clear and concise, and the Wikidata reference (if any) is correct.
-
- Tagging: Document dates are completed and as precise as possible. All mentioned people are tagged and their data is correct. All added keywords are applicable to the item, and other sources have accurate information and functioning links.
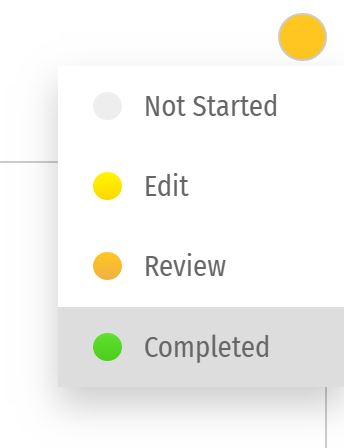
Completion Statuses
| GREY |
| 1. NOT STARTED |
| Tasks have not been started. |
| YELLOW |
| 2. EDIT MODE |
| Tasks have been started, but not yet finished. Additions and edits can still be made. |
| ORANGE |
| 3. REVIEW |
| Tasks are finished, but need final review by Sprinter or Champion transcribers. |
| GREEN |
| 4. COMPLETED |
| Tasks have been fully completed and reviewed. No further changes need to be made. |
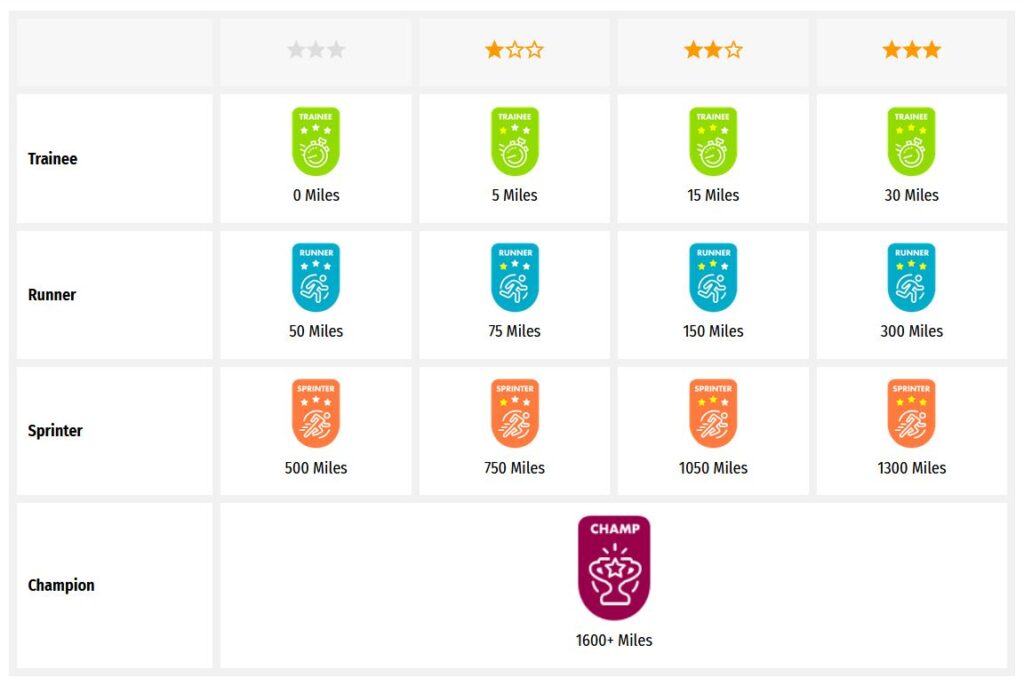
Miles and Levels
Transcribathon is a competitive marathon. You do not enrich documents alone, but compete and work with other volunteers to ensure the quality of your work. When you first create a Transcribathon account, you only have the ability to start and edit tasks. The more you enrich documents, the closer you become to advancing to a higher level, which can unlock abilities like reviewing and completing tasks.| Level | Abilities |
|---|---|
| Trainee | Basic abilities: start and edit tasks |
| Runner | Basic abilities, mark finished tasks for review |
| Sprinter | All Runner abilities, mark reviewed annotations as completed |
| Champion | All Sprinter abilities, mark reviewed transcriptions as completed |
| Tasks | Miles Received |
|---|---|
| Transcription | 1 Mile for every 300 characters transcribed |
| Description | 1 Mile for every 5 Descriptions added |
| Location | 1 Mile for every 5 Locations added |
| Tagging | 1 Mile for every 5 Tags added |
| Reviewing | 1 Mile for every 10 items marked as complete |